Member Descriptions
- Step-By-Step
- Related Tools
Default Descriptions
The entry fields in this column let you enter the default description for the listed member types. This is especially useful if you need to enter non-English descriptions. The description entered here is shown on the callouts for member details, in the Drawing description on the Drawing Data Panel, and on the Description in line 1 on the member's bill of material. Descriptions can be up to 19 characters.
| The Default Description entered here: |

|
| Description in the bill editor: |
|
| Description in the detail callout: |
|
|
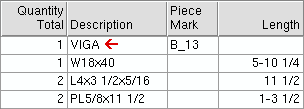
Example: Viga is the Spanish word for beam. You enter VIGA to Beam on this window, then Add several beams to the 3D model. When you Detail Members and select the newly added beams, they will each be identified on their details as a VIGA.
Warning : This should be done at the beginning of a Job, before you Add Member. The description that is given to a member when it is created remains with that member throughout its existence, unless it is changed on the Drawing Data Panel or using Member description in Member Status Review.
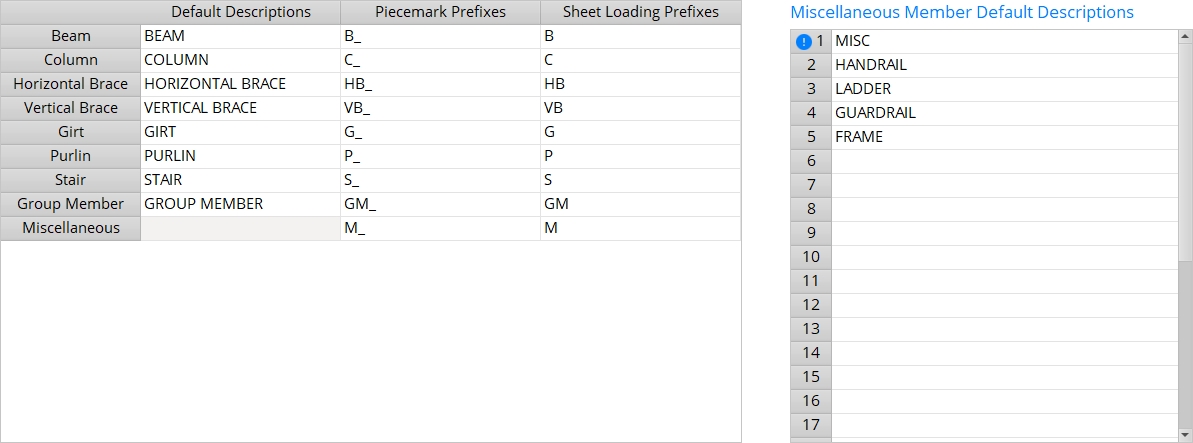
Piecemark Prefixes
Piecemark Prefixes control how member piecemarks are named during Create Solids. For example, if you want beams to be piecemarked B_1, B_2, etc., enter B_ as the Beam prefix.
| Piecemark prefix: |

|
| Piece Mark in the bill editor: |
|
| Piecemark in the detail callout: |
|
|
Sheet Loading Prefixes
| Sheet autoload prefixes (default settings in parentheses): Beam (B), Column (C), Horizontal Brace (HB), Vertical Brace (VB), Girt (G), Purlin (P), Stair (S), Miscellaneous (M), Group Member (GM). |
These prefixes control the renaming of member piecemarks when the option Member type designation is used for piecemark renaming during Auto Change Marks or Detail Sheet Autoloading.
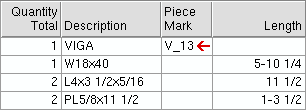
Example 1: You are in Detail Sheet Autoloading and want to add six beam details from zone 1 to sheets and change their piecemarks. You turn Detail piecemark renaming on. You assign Zone an order of 1, enter _ as the User character, assign Member type designation an order of 3, and assign Placement order on sheet an order of 4. You then select enough beam details (all in zone 1) to create two sheets, each with three details. Assuming that B is entered here (on this window) as the Sheet Autoload Piecemark Prefix for beams, the beams will be reassigned the following piecemarks: 1_B, 1_B2, 1_B3, 1_B4, 1_B5, 1_B6.
Example 2: Same as example 1, except that V is entered here (on this window) as the Sheet Autoload Piecemark Prefix for beams. The beams will be reassigned the following piecemarks: 1_V1, 1_V2, 1_V3, 1_V4, 1_V5, 1_V6.
Example 3: Same as example 1, except that you select column details. Assuming that C is entered here (on this window) as the Sheet Autoload Piecemark Prefix for columns, the selected columns will be reassigned the following piecemarks: 1_C1, 1_C2, 1_C3, 1_C4, 1_C5, 1_C6.
Miscellaneous Member Default Descriptions
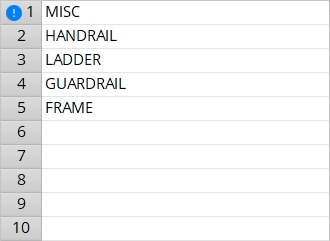
Line 1 is the default description applied to subsequently added miscellaneous members and legacy miscellaneous members.
Any descriptions listed here can be applied to a miscellaneous member as the Member description in Member Status Review.Example: You enter MISC to line 1, HANDRAIL to line 2. When you later Add Miscellaneous Member, you change the Status > Member description from MISC (the default) to HANDRAIL. After you Detail that miscellaneous member, the member is identified on its detail and bill of material as a handrail.
Tracking the descriptions: Miscellaneous member descriptions appear in callouts on member details, in the Drawing description on the Drawing Data Panel, and in the line 1 Description on the member's bill of material.


|
|
OK (or the Enter key) closes this screen and applies the settings.
Cancel (or the Esc key) closes this screen without saving any changes.
Reset undoes all changes made to this screen since you first opened it. The screen remains open.

